Choosing a Solder Reflow Oven is not simply a matter of comparing heating zones, conveyor width, or purchase prices. The right equipment must match your board size, solder paste, component density, production volume, and available workspace. A small prototype board may need a compact oven with stable temperature control. A dense lead-free assembly may require longer heating zones, stronger airflow management, and accurate profiling.
Leo Lambert, a recognized soldering educator and industry expert, often states, “Soldering is a process, not an event.” That principle should guide every purchase decision. A reliable Solder Reflow Oven supports the complete thermal process, from preheating to soak, reflow, and controlled cooling. It should also provide clear profile data, repeatable results, and practical maintenance access.
This guide presents seven useful tips for choosing the right oven. It examines temperature uniformity, zone configuration, nitrogen capability, conveyor design, software, energy use, and after-sales support. These details matter on a real production floor. Operators notice unstable profiles, awkward cleaning, and difficult calibration very quickly.
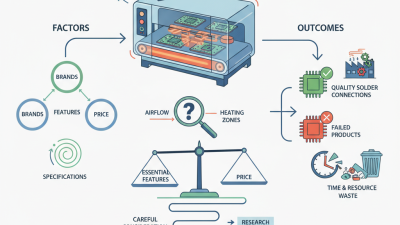
Do not chase specifications alone. A machine with more zones is not automatically better. A cheaper oven may create hidden costs through rework, board warping, or inconsistent solder joints. Even experienced teams can misjudge future capacity. That mistake is worth considering before approval. Review sample profiles, inspect safety features, and test representative assemblies whenever possible. A thoughtful choice improves process control, product reliability, and long-term operating confidence.
Choosing a solder reflow oven starts with defining what your production actually requires. A prototype workshop needs flexibility, while steady production demands repeatable throughput. List your board sizes, component mix, solder paste type, and expected daily output. Small details matter.
I have seen teams choose an oven by chamber size alone. That approach often creates uneven heating, wasted energy, or slow changeovers. Measure the largest assembly, including carriers and edge clearance. Then compare the required temperature profile with the solder paste manufacturer’s data. Zone count, temperature stability, conveyor width, and cooling capacity should support that profile, not merely look impressive on a specification sheet.
Your production goal should also include acceptable defect rates and inspection methods. A reliable process needs recorded profile data, regular calibration, and clear operator procedures. If boards contain dense thermal pads, mixed component sizes, or heat-sensitive materials, test samples under realistic loading conditions. An empty chamber can perform beautifully. A full conveyor may behave differently.
Be honest about future demand. Buying excessive capacity can burden maintenance and training, while choosing too little capacity may restrict growth. I once underestimated setup time between different board designs; the oven itself was capable, but the workflow was not. Include cleaning access, exhaust requirements, spare parts, and operator safety in the evaluation. These practical requirements often influence long-term value more than peak heating speed.
7 Tips for Choosing a Solder Reflow Oven
Choosing an oven starts with board size, throughput, and assembly mix. A batch oven suits prototypes and changing jobs. An inline convection oven supports repeatable production. Vapor phase heating can reduce oxidation and improve heat transfer, but fluid handling needs discipline. Compare chamber width, conveyor clearance, nitrogen control, maintenance access, and power consumption. Measure the board.
Heating method affects profile stability. Convection usually delivers balanced heating across dense assemblies. Infrared responds quickly, yet dark and light surfaces can absorb energy differently. Vapor phase offers uniform condensation heating, especially around large thermal masses. The U.S. Department of Energy’s Industrial Decarbonization Roadmap reports that process heating uses about 51% of industrial energy. Efficiency is not a minor detail.
Build profiles from component limits, not oven presets. IPC-7530C and IPC J-STD-020 provide practical guidance for ramp rate, soak behavior, time above liquidus, and peak temperature. For many lead-free processes, engineers commonly target roughly 0.5–1.0°C per second, 45–90 seconds above liquidus, and a peak near 235–250°C. Verify these values with thermocouples on solder joints, connectors, and heavy copper areas. Do not guess. I once trusted a center-board reading and missed cold joints near a shield. Profile uniformity, recipe storage, alarm records, and calibration history deserve equal attention. Profiles drift. The cheapest oven can become expensive after rework, scrap, and unexplained defects.
Tip 1: Measure your largest board, including edge rails, connectors, and temporary fixtures. Add clearance around every side. A chamber that fits the bare PCB may fail during real production. Aim for at least 50 millimeters of working space around the loaded board. Measure twice. My early estimate was too tight.
Tip 2: Match board capacity with your actual batch size. If one board enters the chamber, loading speed may limit daily output. If several boards fit, check whether airflow and heating remain even. Place sample thermocouples near corners and dense component areas. A crowded chamber can create uneven soldering, even when the display shows the correct temperature.
Tip 3: Consider future board sizes, but avoid buying excessive capacity. A very large chamber can consume more power and require longer heating cycles. Record your current board dimensions, expected growth, and maximum fixture width. Leave room for safe handling, not empty space without purpose. Capacity calculations are easy to overlook. Recheck them with operators who load the oven daily. Their practical experience often reveals awkward doors, narrow rails, or difficult cleaning access.
7 Tips for Choosing a Solder Reflow Oven
Choosing a solder reflow oven starts with its control system. Look for clear temperature settings, stable recipe storage, and readable process data. Data logging helps operators compare each production run. It also supports traceability when solder joints need investigation. Avoid controls that feel impressive but confuse new users. I have seen small interface problems become costly production delays. Test the menu with gloves on.
Temperature uniformity matters more than a high peak temperature. Ask for test results across the working area, not only at the center. Use several thermocouples during evaluation. Check heating and cooling performance under a realistic board load. Airflow should remain consistent when boards move through different zones. Uneven heating can cause weak joints, component stress, or excess residue. “Uniformity needs evidence.”
Safety features deserve equal attention. Check door interlocks, over-temperature alarms, emergency controls, and ventilation connections. Confirm that hot surfaces are guarded and maintenance access is practical. Written operating procedures should match the machine’s actual controls. A safety function that nobody understands is not reliable. Review inspection records and ask who handles calibration.
Energy efficiency can reduce operating costs without weakening process control. Examine insulation, standby settings, heat recovery options, and warm-up time. Choose a chamber sized for your normal workload. An oversized oven may waste energy between batches. Still, efficiency claims require measured data, not attractive estimates. I would record power use during idle, warm-up, and continuous operation. The results may challenge initial assumptions.
| Tip | Evaluation Dimension | What to Check | Practical Benchmark | Why It Matters | Verification Method |
|---|---|---|---|---|---|
| 1 | Temperature Control | Check the number of independently controlled heating zones, temperature sensor type, set-point resolution, and recipe repeatability. | Set-point resolution of 1°C or finer; closed-loop control; stored recipes with access control. | Accurate control helps the assembly follow the solder paste manufacturer’s recommended preheat, soak, reflow, and cooling conditions. | Run the same recipe repeatedly and compare logged temperature profiles from multiple cycles. |
| 2 | Thermal Uniformity | Evaluate temperature variation across the usable work area and from cycle to cycle. Consider board size, conveyor loading, and airflow design. | Aim for approximately ±3°C to ±5°C across the qualified area, depending on process requirements. | Uniform heating reduces cold joints, solder bridges, component damage, and uneven flux activation. | Attach thermocouples to board corners, center areas, and thermally demanding components; compare the recorded profile. |
| 3 | Profile Management | Look for programmable ramp, soak, peak, time-above-liquidus, cooling, alarm limits, data export, and traceability functions. | Profile logging with at least one sample per second is useful for process validation and troubleshooting. | Profile data provides evidence that the process remains within the solder paste and component temperature limits. | Confirm that profile files can be saved, exported, time-stamped, and linked to production lots or work orders. |
| 4 | Capacity and Throughput | Compare chamber or conveyor width, usable height, board spacing, maximum board dimensions, and warm-up time. | Select capacity based on the largest planned assembly plus clearance; avoid sizing only for current boards. | A correctly sized oven prevents restricted airflow, handling delays, and unnecessary rework when product mix changes. | Measure the largest actual panel and confirm clearance, support requirements, and maximum conveyor loading in the specification. |
| 5 | Safety and Fume Management | Review over-temperature protection, emergency stop functions, guarded hot surfaces, exhaust provisions, and fault alarms. | Independent over-temperature cutoff, visible fault indication, and accessible emergency stop. | These features reduce the risk of burns, fire, equipment damage, and exposure to process fumes. | Inspect the safety circuit, alarm behavior, exhaust connection, ventilation requirements, and applicable local electrical standards. |
| 6 | Energy Efficiency | Assess insulation, standby mode, heater power, warm-up duration, exhaust heat loss, and energy use under normal production conditions. | Prefer automatic standby or sleep control and insulated heating zones; compare energy per board rather than heater wattage alone. | Lower energy consumption can reduce operating cost while limiting unnecessary heat release into the workplace. | Measure electricity use with a power meter during warm-up, steady production, idle, and shutdown conditions. |
| 7 | Maintenance and Calibration | Check access to heaters, fans, filters, thermocouples, conveyor components, calibration tools, spare parts, and service documentation. | Document calibration intervals and verify temperature sensors at least according to the process quality plan. | Regular maintenance preserves temperature accuracy, conveyor stability, repeatability, and equipment uptime. | Review the maintenance schedule, calibration certificates, spare-part availability, cleaning procedure, and service response terms. |
Tip 1: Assess maintenance before comparing heating performance. Ask how often filters, fans, thermocouples, and conveyor parts need attention. A clean chamber and stable airflow protect soldering consistency. During a factory trial, I would inspect access panels and record the time needed for routine cleaning. If maintenance requires special tools, downtime may become expensive.
Tip 2: Examine software features through real production tasks. Useful controls include recipe versioning, user permissions, alarm history, temperature profiling, and exportable process data. The interface should show problems clearly, not hide them behind crowded screens. Test whether operators can recover from a failed run without guessing. I have seen impressive demonstrations become confusing during shift changes. That gap matters.
Tip 3: Calculate total cost beyond the purchase price. Include electricity, ventilation, calibration, spare parts, training, software updates, and service response. Estimate the cost of one hour of production downtime. Then compare it with the oven’s expected maintenance schedule. A cheaper unit may consume more energy or require frequent manual checks. That is easy to overlook. Ask for documented performance data, not only sales estimates. Keep a written record of assumptions, because early calculations are often incomplete. The final choice should reflect your actual board sizes, throughput, staffing, and quality requirements.
This suggested evaluation framework prioritizes process control, maintenance access, software traceability, energy efficiency, and total cost. Buyers should adjust the weights according to production volume, board complexity, required atmosphere, and quality standards.